
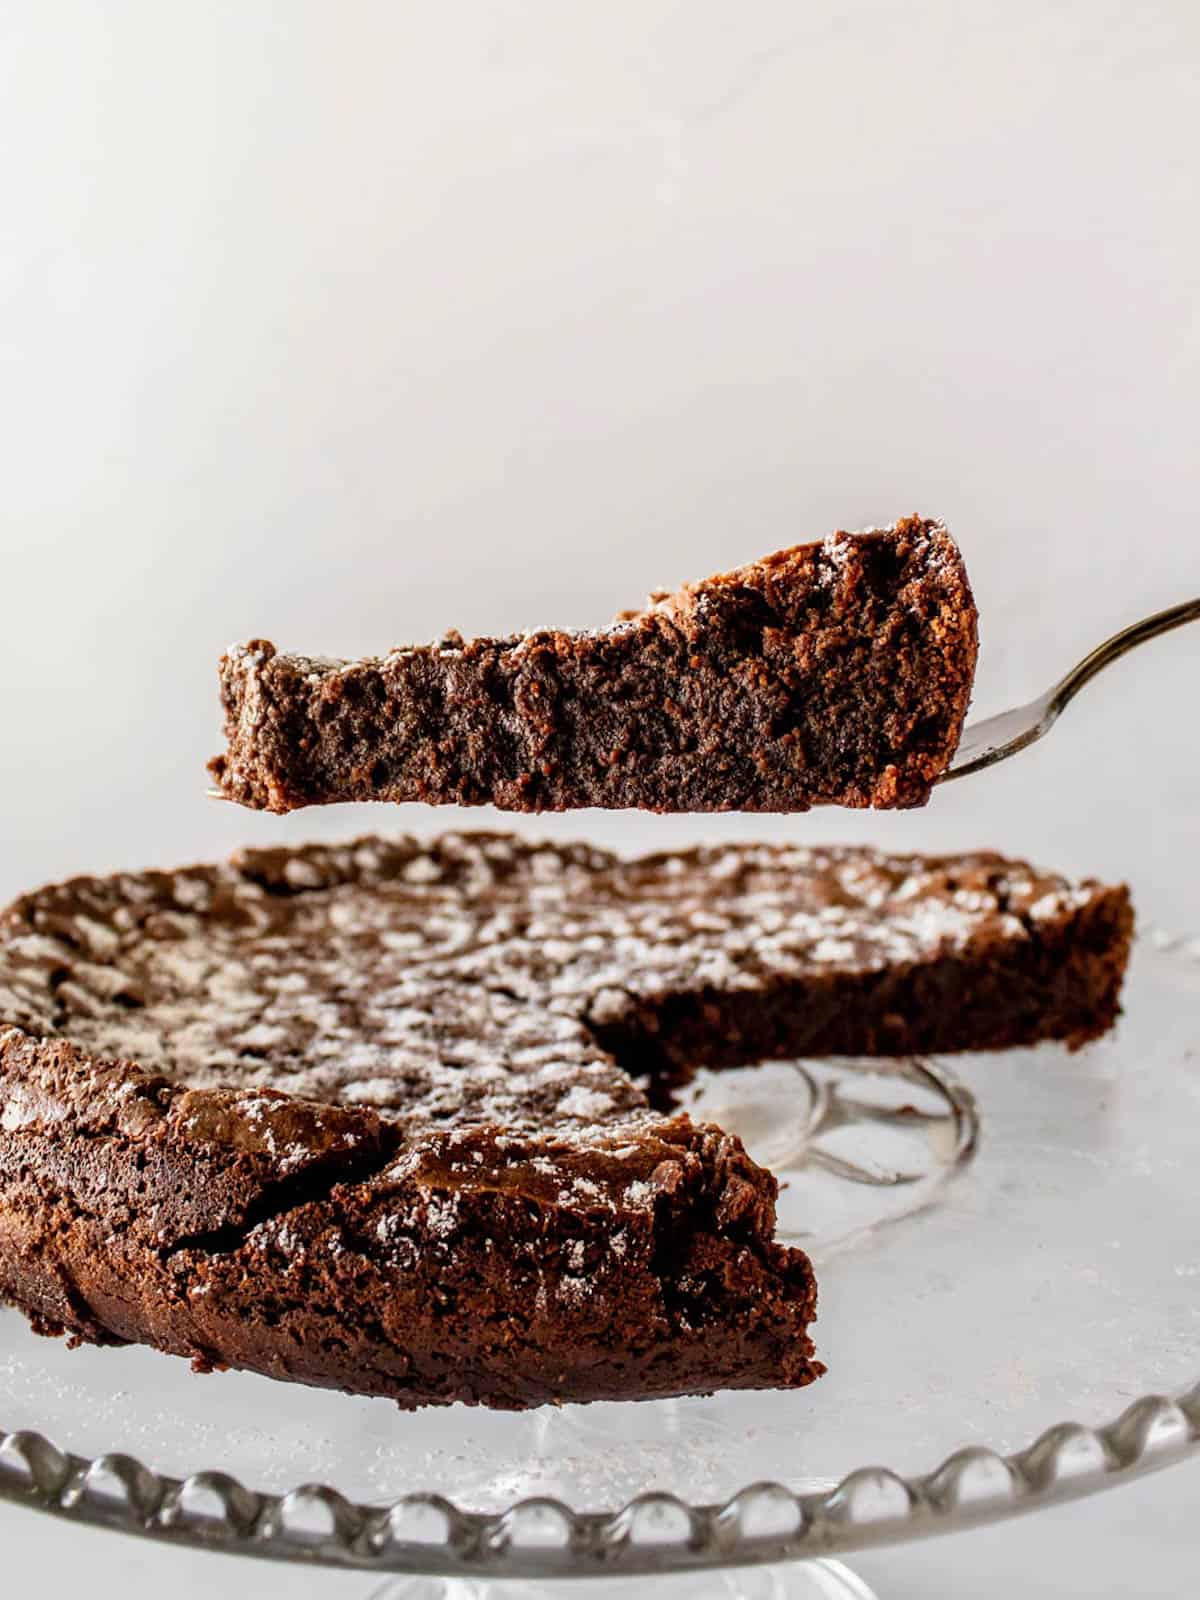
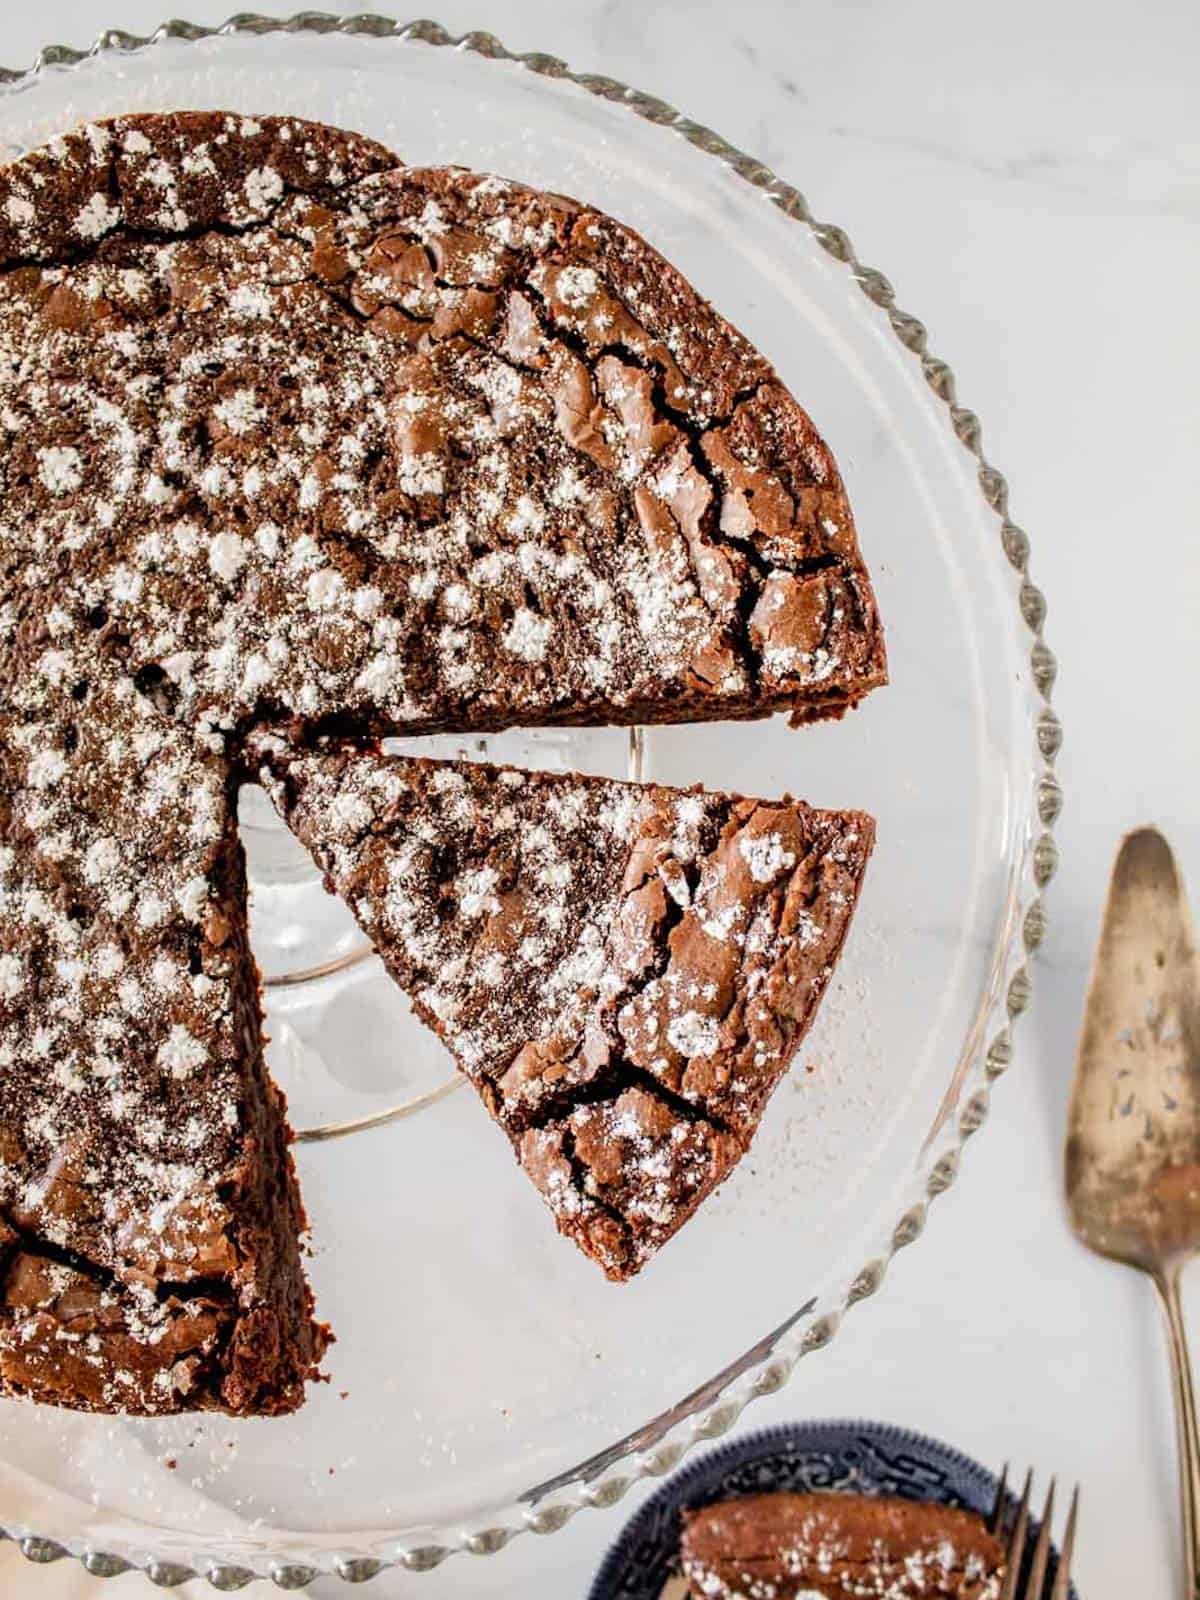
This Almost Flourless French Chocolate Cake is deceptively easy, yet will make you look like a professional baker! It has a deep chocolate flavor with a light texture that is between cakey and fudgy. Guests go crazy for this impressive dessert which is easy enough for a casual gathering and elegant enough for a special occasion.
Like a little black dress, this Almost Flourless Chocolate cake is versatile and can even be adapted for Passover by swapping the flour for matzo meal. Or I also recommend my other favorite chocolate cake: Nutella Flourless Chocolate Cake, which is kosher for Passover too.
Jump to:
Why You'll Love This Recipe
- Not fussy! No need to separate egg whites from egg yolks, and no whipping to soft peaks.
- Perfect texture between a cake and fudge.
- Just the right amount of richness and sweetness.
- Can be easily made kosher for Passover with a simple ingredient swap.
Dana’s Note: This chocolate cake recipe has gone viral by word of mouth. Guests frequently ask me for the recipe, and now it has made its way around my daughter's school. Countless people have come up to me in the hallway to thank me for this recipe.
The original recipe was discovered by my sister in a Bon Appetit print issue a long time ago. A reader submitted the recipe, which had come from their French au pair. I can no longer locate this recipe online, so I'm happy to have the recipe live on my site. This foolproof recipe is a go-to recipe for many people, and I hope it will be for you too.
Ingredient Notes and Substitutions
See the recipe card below for a complete ingredient list and measurements.
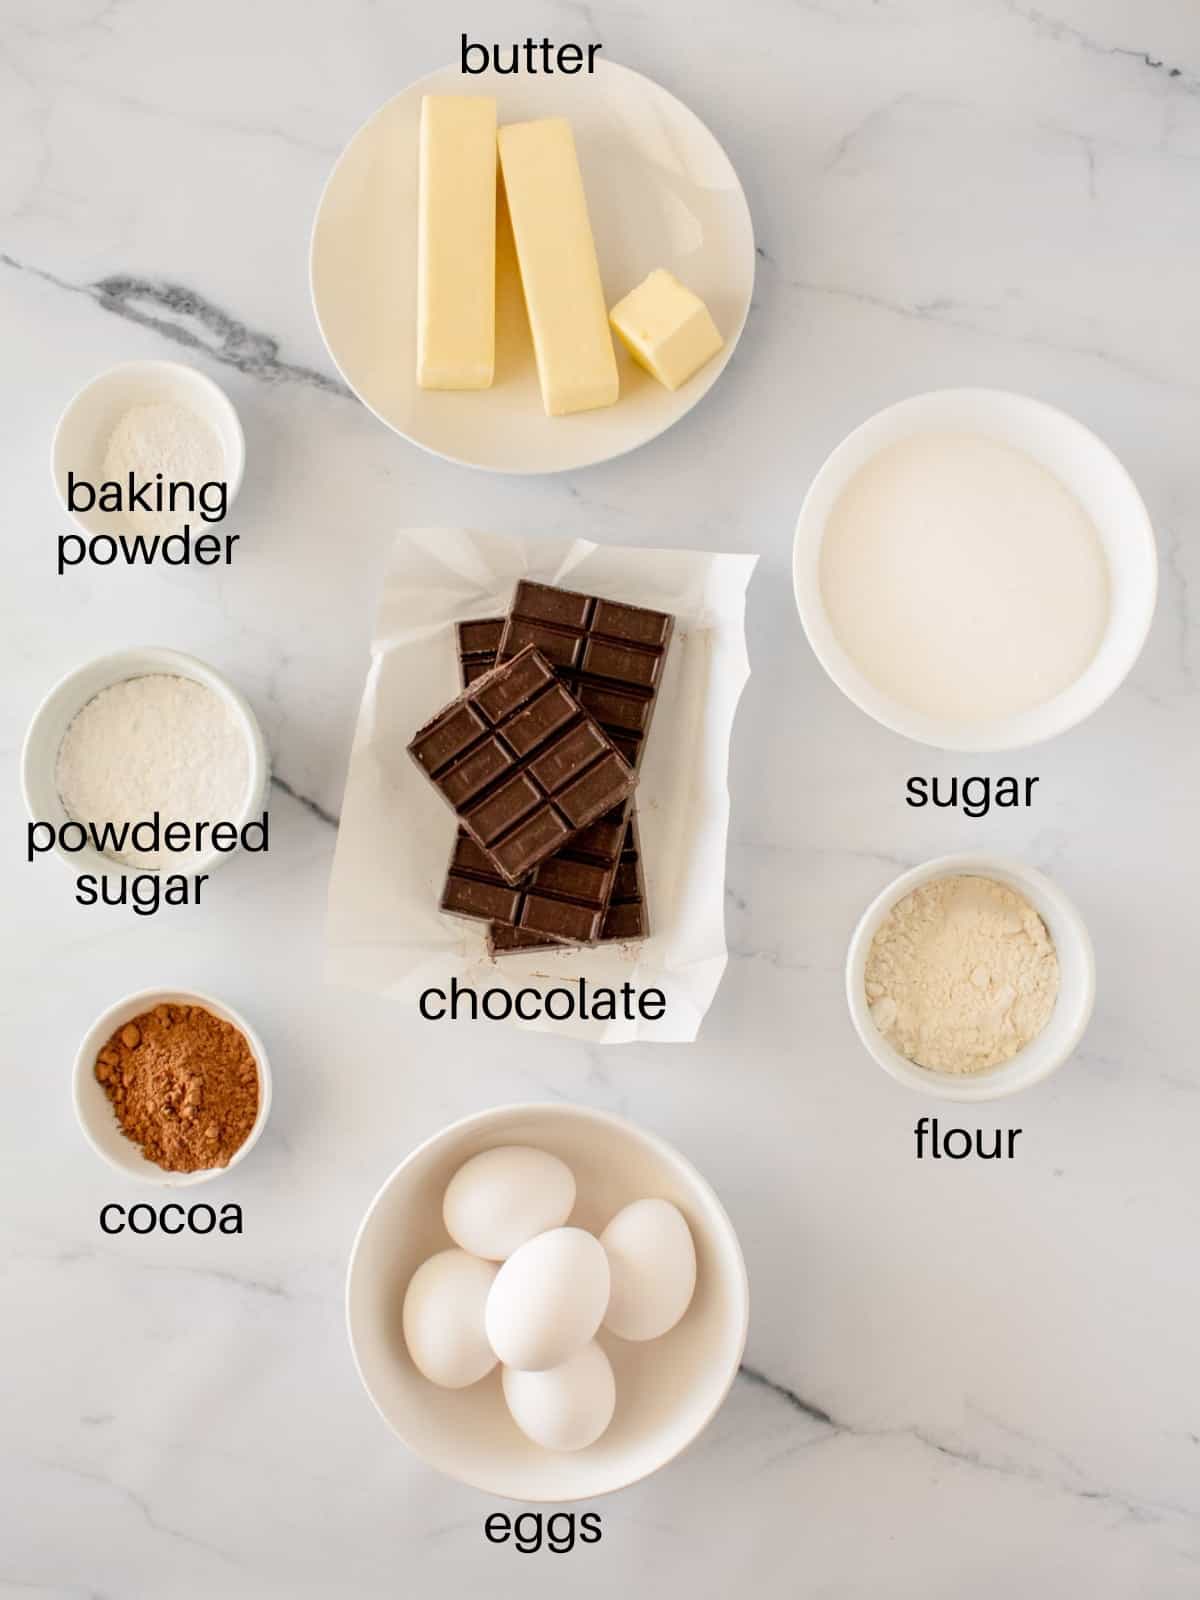
- Semisweet chocolate - I have tested this recipe with the following chocolate brands: Guittard bittersweet chocolate baking bar, Baker’s Premium Baking Bars, and Ghirardelli Premium Baking semi-sweet chocolate bar. They all come out very well.
- Flour - The original recipe is made with unbleached all-purpose flour. During Passover, I have substituted with an equal amount of matzo cake meal OR matzo meal, and either one comes out very well and is not detectable in the cake.
- Baking powder - To check if baking powder is still active, add hot water over a small amount of baking powder. If it bubbles, it is still active and good to use.
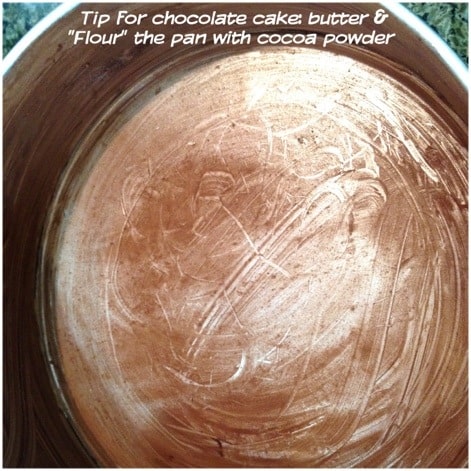
- Cocoa powder - I like to use cocoa powder instead of flour when buttering a pan to prevent a chocolate cake from sticking. Any cocoa powder residue that remains on the outside of the cake after baking won't be visible. No white streaks from flour on a brown cake!
- The remainder of the ingredients include unsalted butter, eggs, granulated white sugar, and powdered sugar (for decorating).
Passover Variation
This cake can be easily modified for Passover by swapping out the flour for matzo meal or matzo cake meal. It's only a small amount of matzo meal, so it's not detectable at all. This cake is not just a Passover dessert that's pretty good by Passover standards. This cake is amazing, period.
Step by Step Photos
See the recipe card below for complete directions. Use these photos to help visualize the recipe process.
STEP ONE: Prepare the pan
Prepare a 10 inch springform pan by buttering the inside of the pan and lightly dusting with cocoa powder (or flour). Measure 2 pieces of aluminum foil that are slightly larger than the pan and set aside.
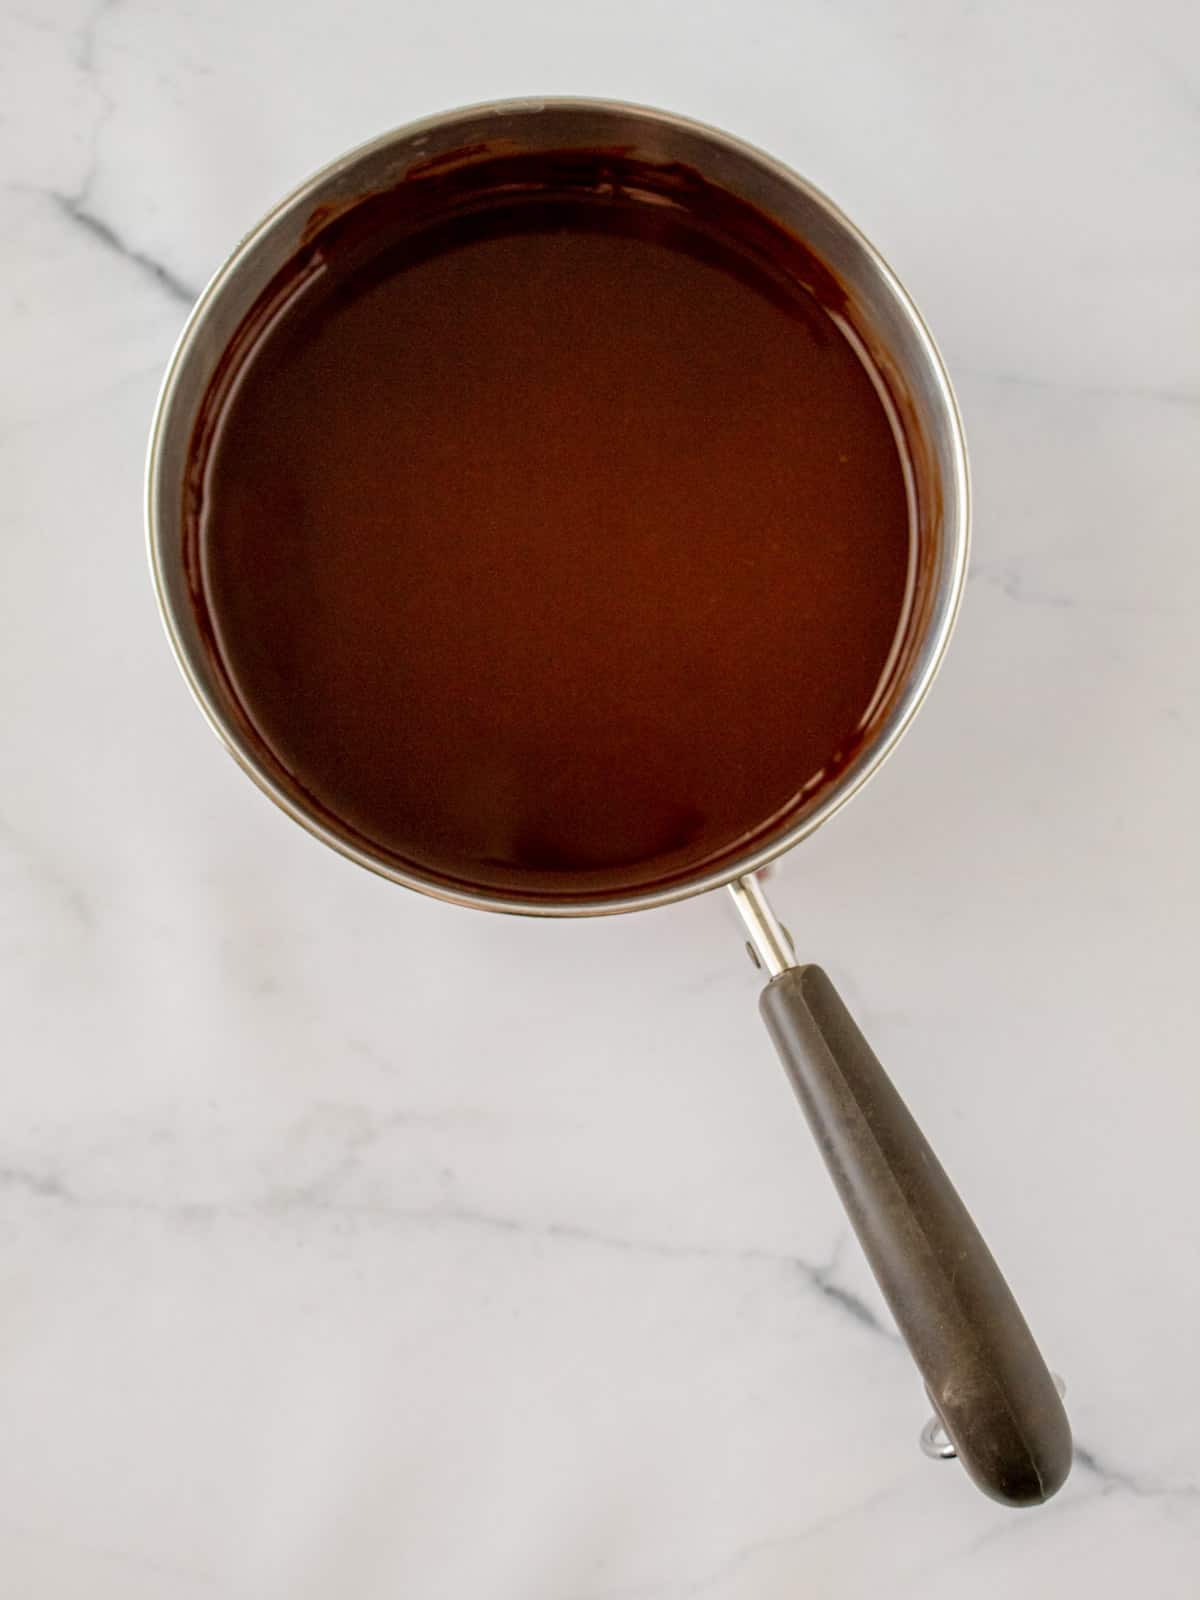
STEP TWO: Melt chocolate and butter
In a small saucepan, heat the chocolate and butter over low very heat until melted and smooth. Stir periodically. Don’t turn the heat too high, or the chocolate may burn.
You can also melt the chocolate and butter in the microwave at 50% power in 30 second increments. Do this a few times, stirring in between, until everything is melted and smooth.
Allow the mixture to cool slightly.
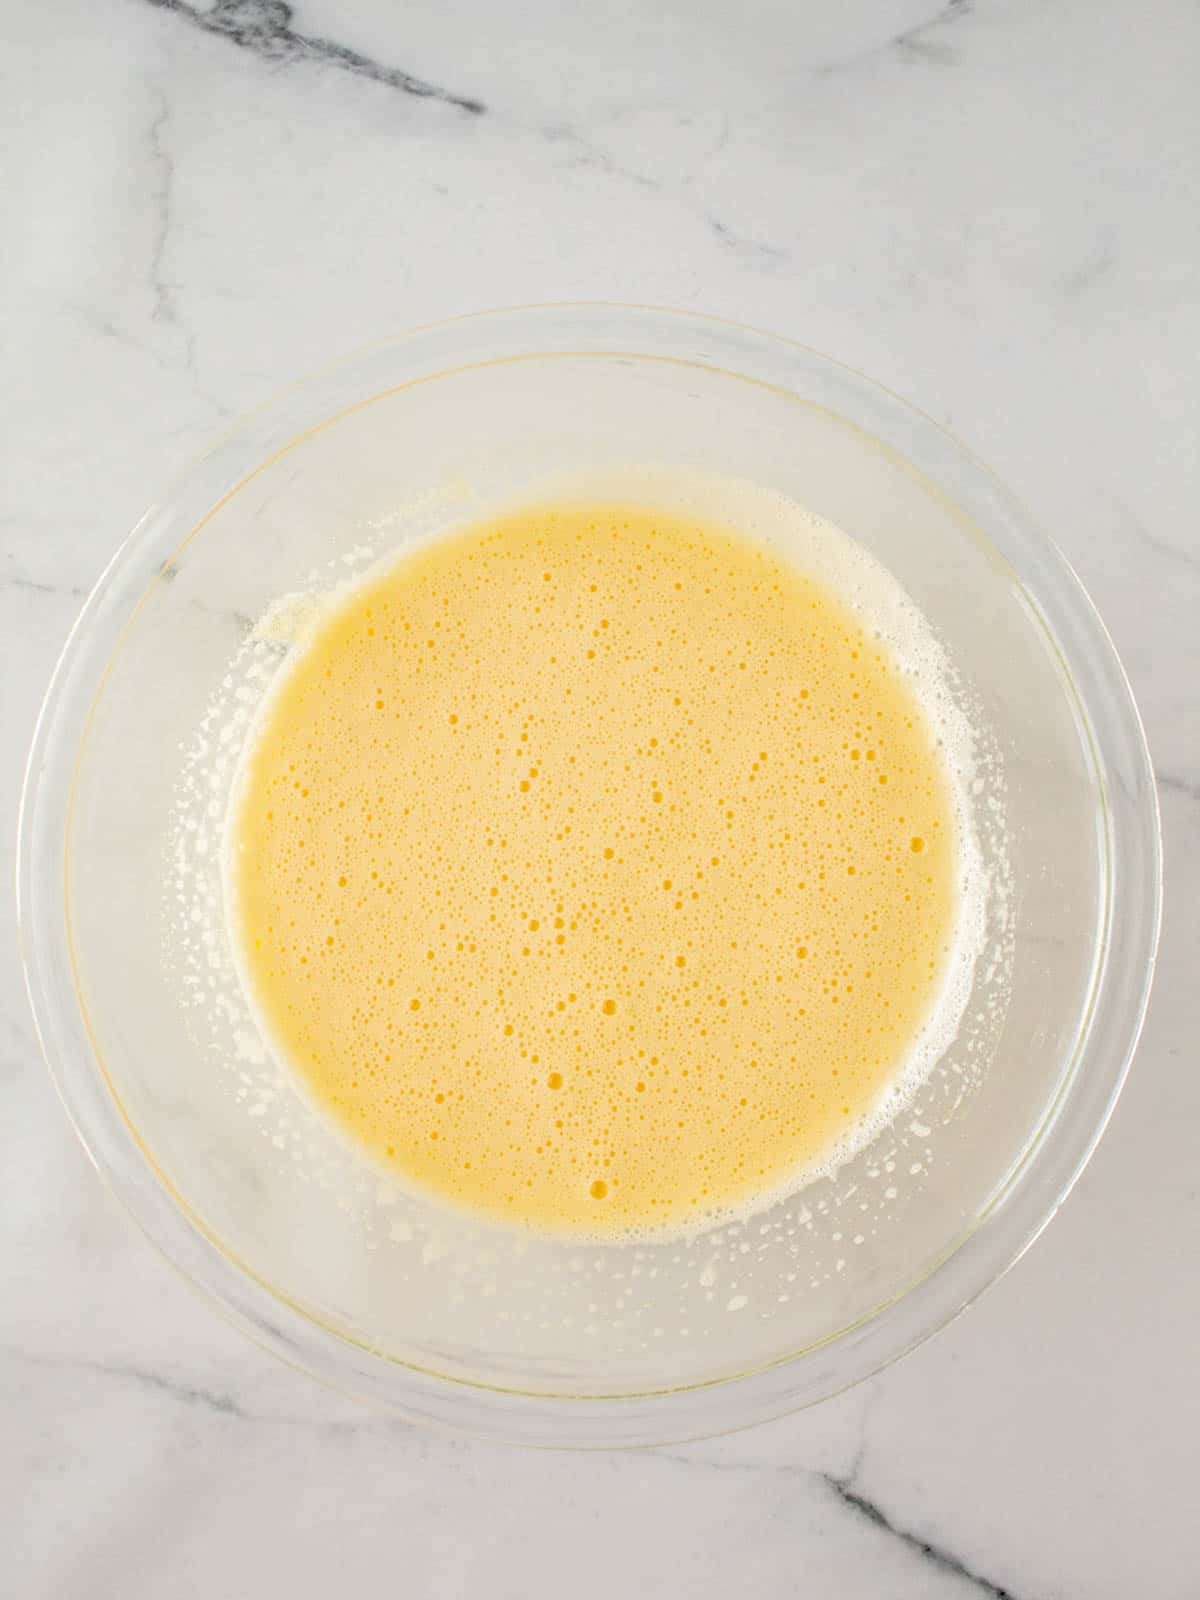
STEP THREE: Beat eggs
In a separate large bowl, beat the eggs and sugar until ingredients are well combined and the mixture begins to thicken. You can do this with an electric hand mixer or whisk it yourself by hand.
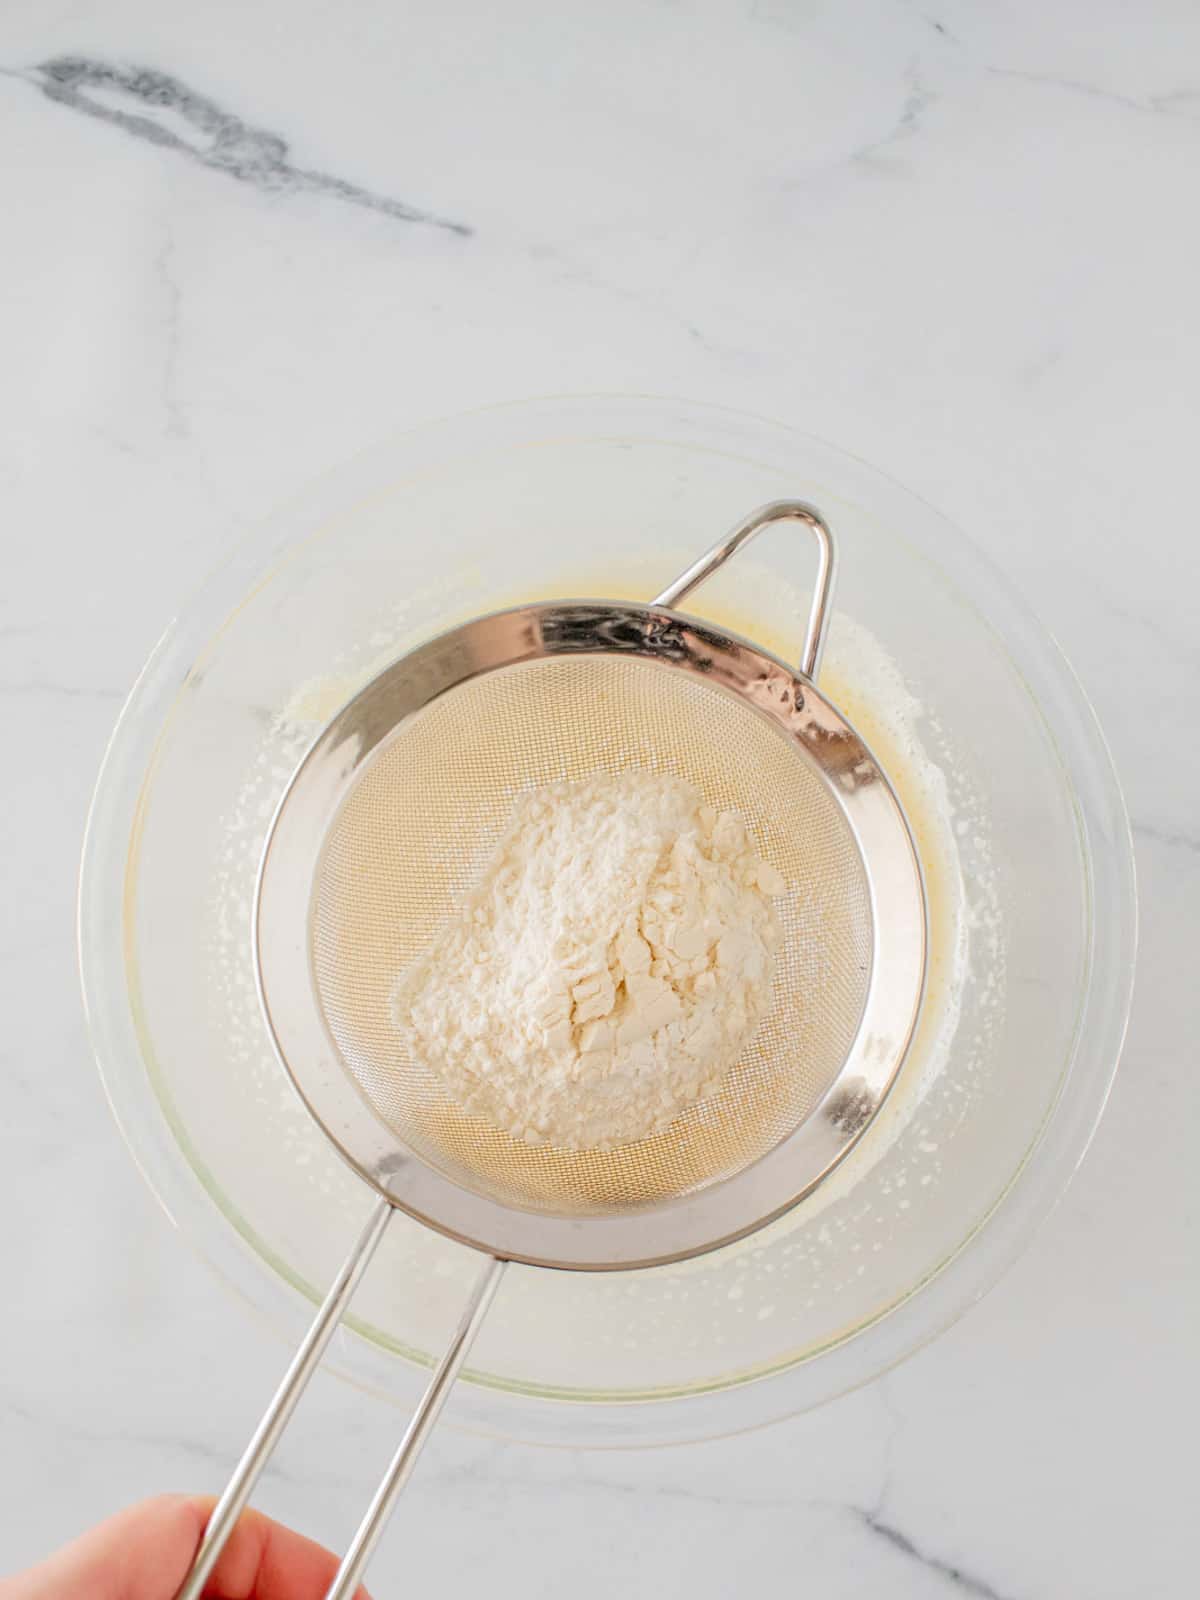
STEP FOUR: Sift
Sift the flour and baking powder over the egg mixture. Gently fold flour into the mixture until incorporated.
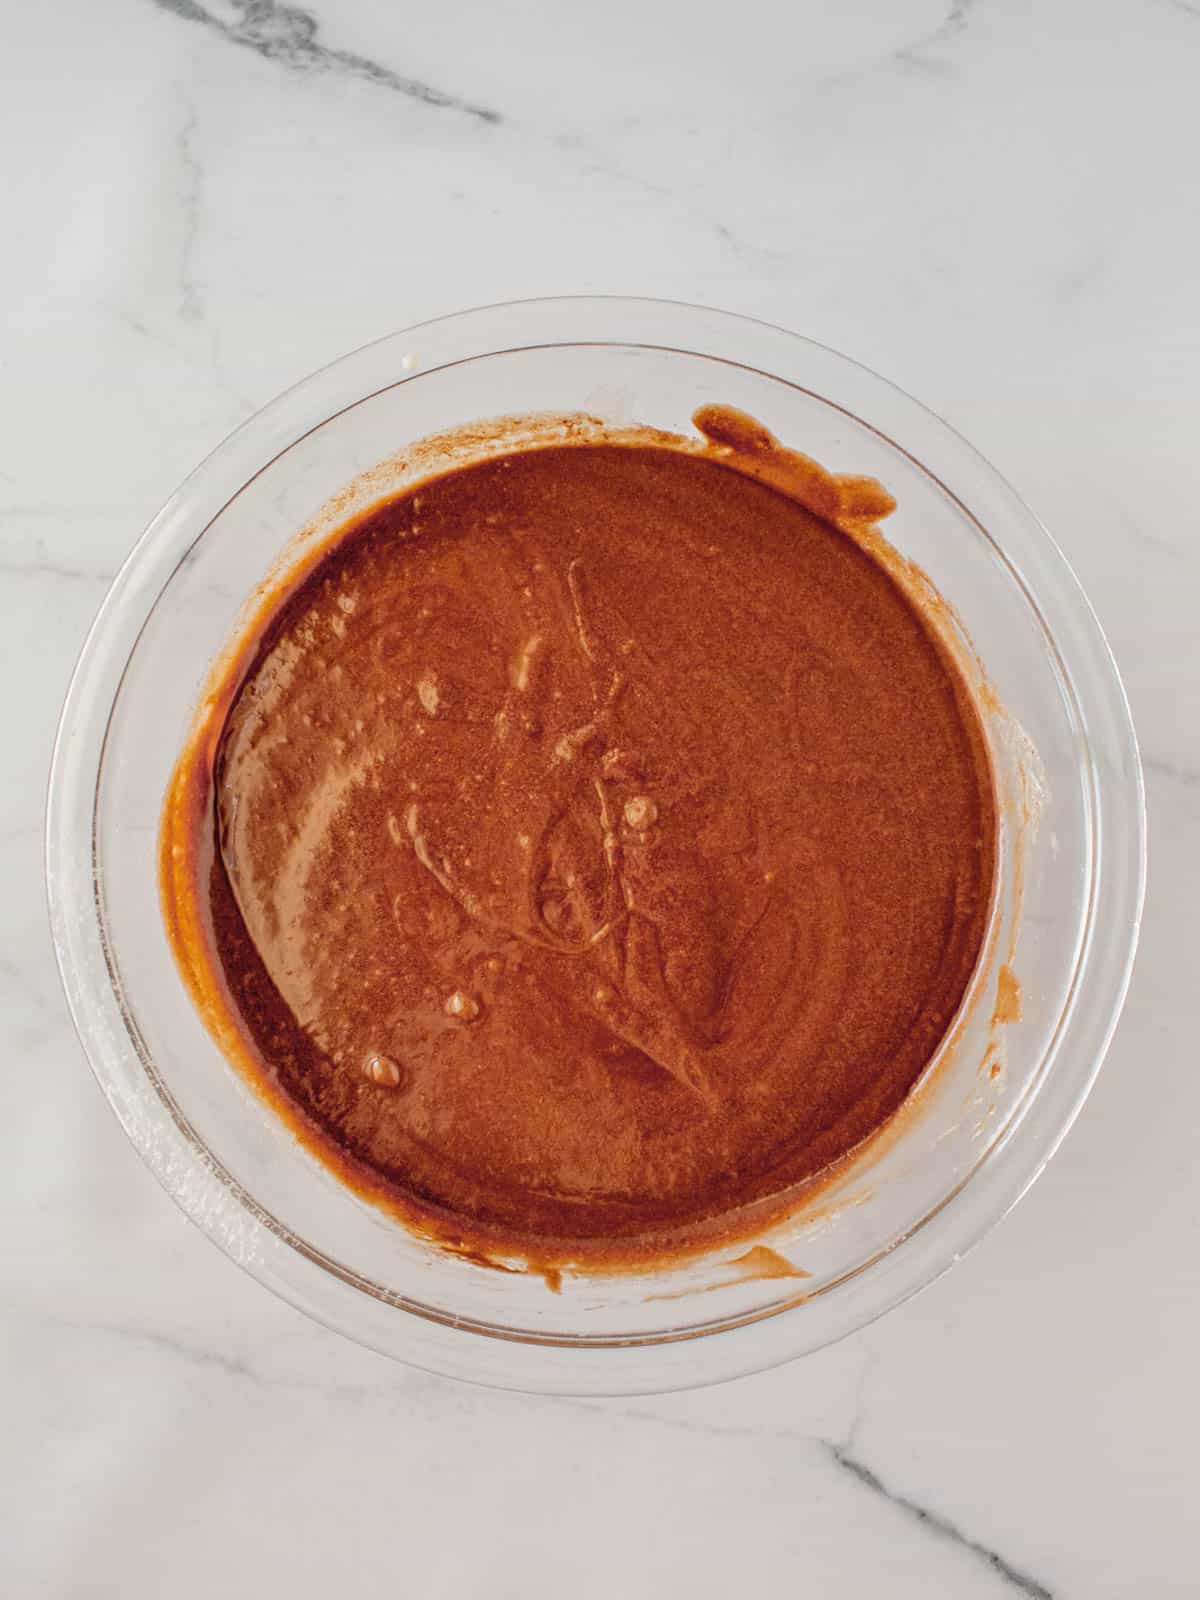
STEP FIVE: Fold
Next, gradually fold the melted chocolate mixture into the egg, sugar, and flour mixture until incorporated. Pour the cake batter into the prepared pan.
STEP SIX: Bake
Place the springform pan in the oven with one piece of foil under the pan to catch any drips. Bake the cake uncovered for 20 minutes.
Then remove the foil from under the pan, and place a clean piece of foil resting on top of the cake pan. Finally, bake the cake covered for 30 minutes more.
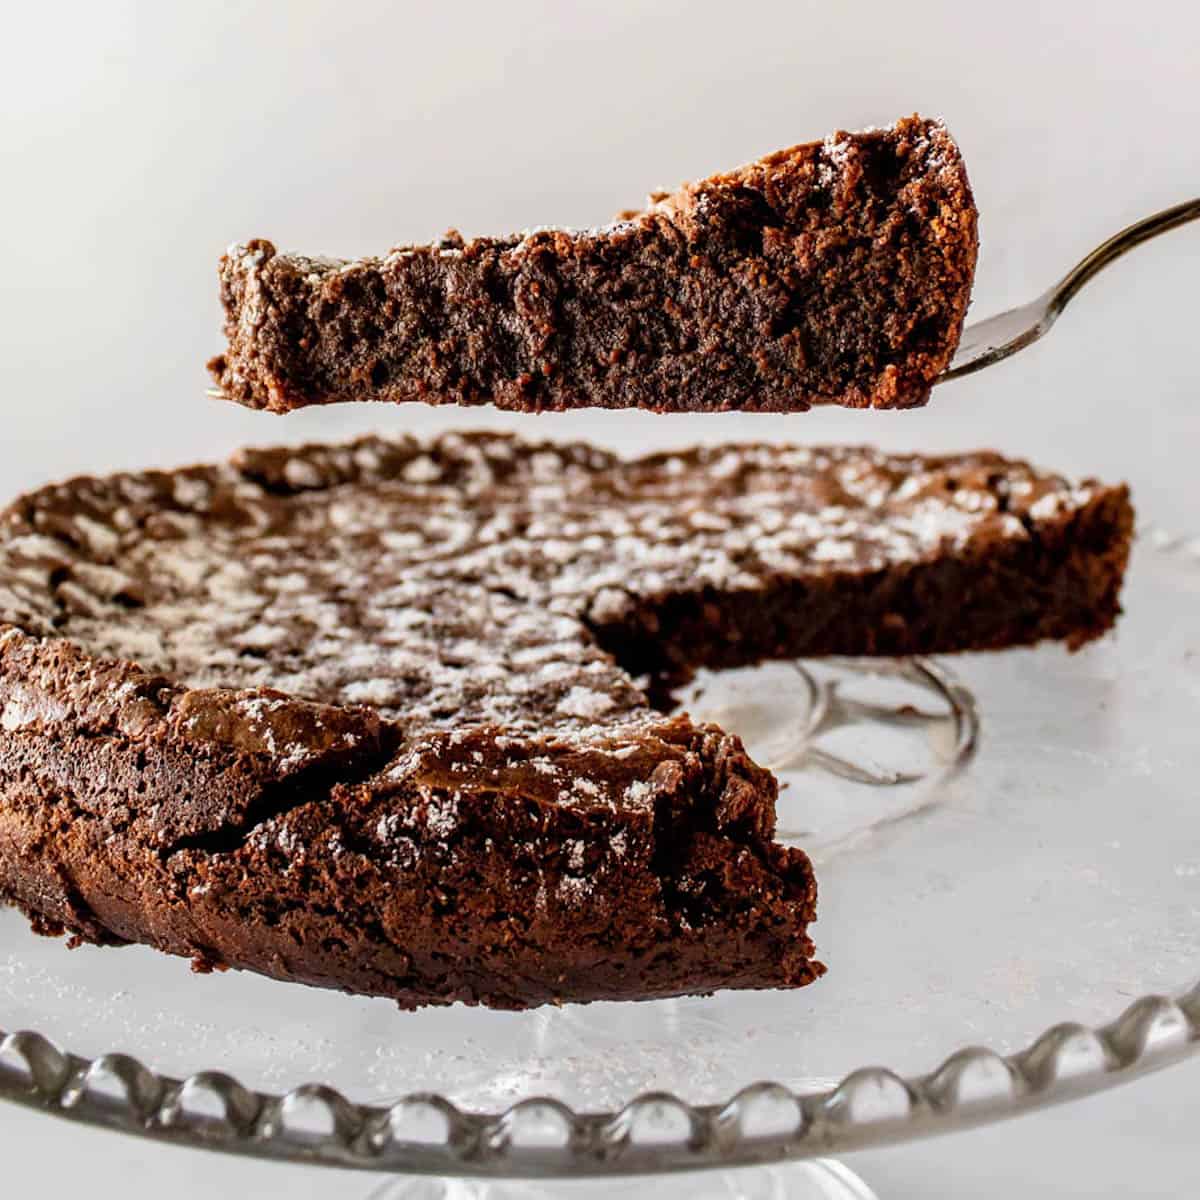
The cake is done when a toothpick inserted into the center of the cake comes out with moist crumbs attached (rather than a wet batter). The cake should also start to pull away from the sides of the pan.
Set the cake uncovered in the pan on a rack until it is cool. The cake will fall slightly in the center.
Once the cake cools, run a knife or thin spatula around the inside of the pan to loosen the cake. Gently remove the side of the springform pan.

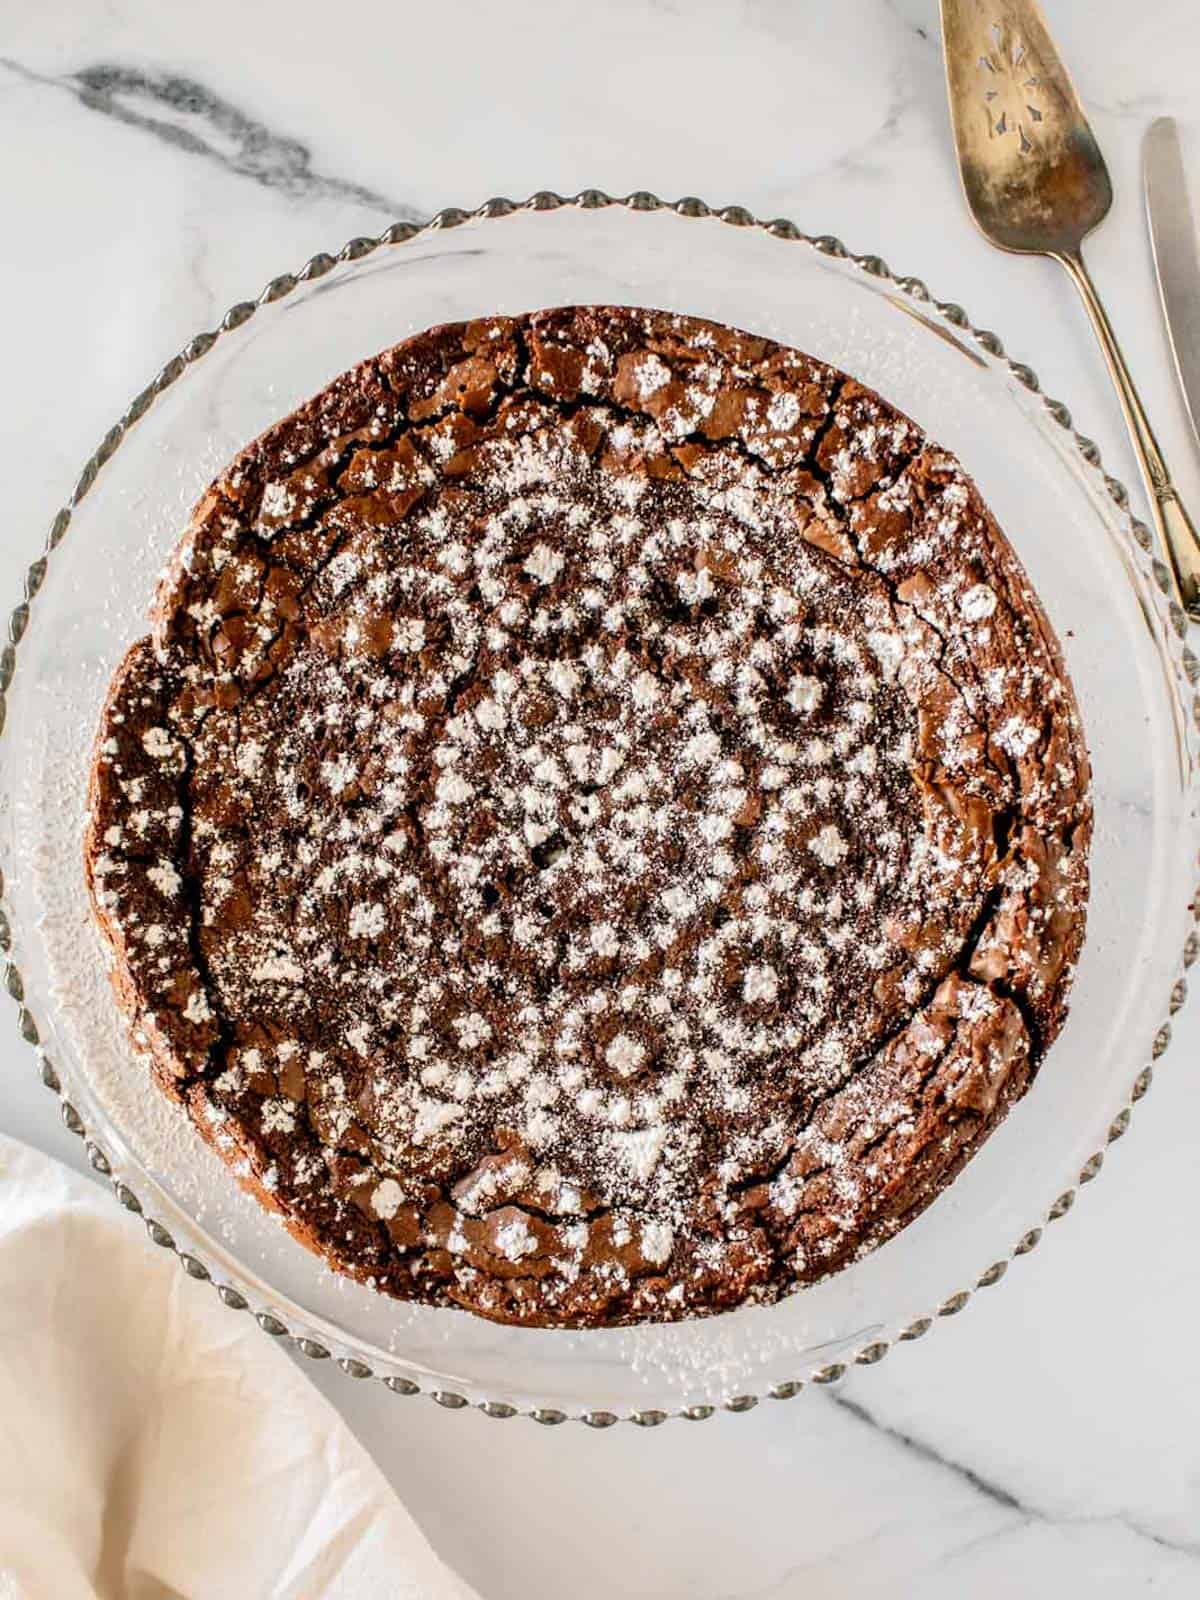
STEP SEVEN: Decorate
Once the cake is completely cool, sift confectioners’ powdered sugar over the cake so that it looks like a dusting of light snow. You can use a sifter, sugar shaker, or small hand-held colander to sprinkle the sugar on the cake for decoration.
Alternately, for an extra pretty presentation, use a stencil or doily to make a pattern with the powdered sugar. The best way to do it is to gently hold the stencil/doily down flat against the cake with one hand, and then sprinkle the powdered sugar over the holes with the other hand. If the stencil is held too high above the cake, the pattern gets blurry. Sprinkle with a sugar shaker or a small hand-held colander with powdered sugar. Fill the stencil holes with sugar. It works even better with two people- one person to hold down the stencil with both hands, and the other person to sprinkle the sugar over the stencil.
Once you finish sprinkling the sugar, you need to put your hands on each side of the stencil and then lift straight up so that you don't smear the design. You can practice on a colored plate until you feel ready to do it on the real thing. The result is a beautiful confectioners’ sugar design!
STEP EIGHT: Serve
Serve this cake as is, or with a scoop of vanilla ice cream, fresh raspberries, or a dollop of whipped cream. It’s also delicious atop a bed of raspberry sauce on the bottom of a serving plate.
How to fold ingredients
Folding is a mixing technique that will help insure that your French chocolate cake will be as light and delicious as possible.
In Step 5 of this cake, the lighter egg mixture needs to be incorporated with the denser chocolate mixture. The mixing motion needs to be done gently so that the lighter, airier mixture keeps its fluffy texture. Doing this too vigorously will cause the air to escape from the lighter ingredient, causing the cake to be more dense.
This gentle mixing is called folding, and it's done like this: Add the chocolate mixture to the egg mixture. Hold a silicone spatula or large mixing spoon above the bowl with the utensil's flat surface parallel to the surface of the bowl. In a continuous swooping motion, gently go into the ingredients on one side of the bowl, slowly move the utensil across the bottom of the bowl, and then come up the other side in a continuous, slow circular motion.
Repeat this motion starting in different sections of the bowl until the mixture is smooth and incorporated using as few gentle strokes as possible to accomplish the task.
Top Tips
- Use baking chocolate bars to produce a cake with best taste and texture. Chocolate chips may be made with stabilizers to help them hold their shape, so they're not the best match for this cake.
- Be careful not to burn the chocolate when melting it by keeping a low temperature on the stove, or microwaving at half power.
- Dust cocoa powder into the bottom of the buttered pan to help keep it from sticking. Or you can cut a circle of parchment paper for the bottom of the pan, but I find using cocoa powder works just as well.
- How to tell when the cake is done? It should start pulling away from the side of the pan, and be set in the middle. Insert a toothpick into the center of the cake. It should have moist crumbs, and not a wet batter.
- Decorate the cake by sifting powdered sugar over a doily or stencil.

Make Ahead
You can make this cake one day ahead of time and store it covered on the counter.
You can also freeze this cake whole for up to a month. Defrost covered on the counter overnight and serve.
Storage and Reheating
How to store: Store leftovers covered on the counter for up to 3 days.
How to freeze: Freeze this cake in an airtight container for up to 1 month.
More dessert recipes
- Italian Chocolate Chip Cookies
- Passover Flourless Chocolate Cake with Nutella
- Honey Cookies
- Passover Macaroons
Linger at Dana's Table a little longer for more free recipes.
Subscribe to my newsletter, and follow along on Facebook, Instagram, and Pinterest for the latest updates.
Recipe
Almost Flourless French Chocolate Cake
Ingredients
- 10 ounces semisweet chocolate baking bar
- 1 cup unsalted butter 2 sticks, plus extra for greasing the pan
- 5 large eggs
- 1 ¼ cups granulated white sugar
- 5 tablespoons unbleached all-purpose flour During Passover, substitute with Matzo cake meal OR matzo meal
- 1 ½ teaspoons baking powder
- cocoa powder for dusting the pan or additional flour
- powdered sugar for garnishing the finished cake
Instructions
- Place rack in the middle of the oven, and preheat to 325ºF. Prepare a 10 inch Springform Pan by buttering the inside of the pan and lightly dusting with cocoa powder (or dust with flour). Measure 2 pieces of aluminum foil that are slightly larger than the pan. Set aside.
- Melt chocolate and butter in a small, heavy saucepan on the stove with low heat and stir periodically. Alternatively, melt in the microwave with 50% power until just melted; do not overcook. Stir so ingredients are combined and smooth. Set aside to cool a little.
- In a separate large bowl, beat the eggs and sugar with a mixer or whisk vigorously until ingredients are well-combined and the mixture begins to thicken.
- Sift the flour and baking powder over the egg mixture. Then gently fold until incorporated.
- Next, gradually fold in the chocolate mixture. Pour batter in the prepared pan.
- Place the cake pan in the oven with one piece of foil under the cake pan to catch any drips, and bake the cake uncovered for 20 minutes. Then remove the foil from under the pan, and place a clean piece of foil resting on top of the cake pan. Bake the cake covered for 30 minutes more. The cake is done when a toothpick inserted into the center of the cake comes out with moist crumbs attached.
- Let cake cool uncovered in the pan on a rack. The cake will fall a little. When the cake cools, run a knife or thin rubber spatula around the inside of the pan to loosen the cake. Remove the side of the springform pan. Garnish cake by sifting powdered sugar over the top of the cake like a dusting of snow. You can even use a stencil or doilies on top of the cake to make a pattern with the powdered sugar. Enjoy!
Notes
Nutrition
Nutritional Disclaimer
Nutritional information is an estimation only.
Dena says
Looks great! When a relatively low amount of flour is used in a recipe (such as this one) I use half as much potato starch instead for the same result, but without the Passover dessert "taste" that even that little amount of matzoh meal imparts, IMHO.
Dana Shrager says
Thank you for offering this Passover dessert advice which I’m sure is helpful for many recipes. If you try the potato starch substitute in this cake, please report back how it turns out. Nevertheless, for this chocolate cake recipe in specific, surprisingly, I (as well as my guests) have not found the matzo meal/matzo cake meal to be detectable.
Susan Kleiner says
When you say “half as much potato starch” can you be a little more specific on the amount please. Thank you.
Michelle says
Tried this recipe for my hubby’s birthday and it did not disappoint. I used a regular round nonstick pan lined with baking paper, and it worked fine. Next time, I will serve it warm with vanilla ice cream. Thank you for sharing this recipe, it will now be part of the family’s favorites!
Dana Shrager says
Hi Michelle, thanks for these tips! So glad that this cake was a hit for your husband's birthday.
Lois says
Is it better to use margarine or oil for pareve? Which sugar substitute do you suggest?
Dana Shrager says
I haven't tested this recipe with alternate ingredients. I think that margarine would be better than oil for this cake. My kosher pastry chef colleague recommends Fleischmann's Margarine for baking. I'm not versed in sugar substitutes. If you adapt this recipe, I'd love to hear how it comes out so we can let others know who'd like to do the same.
Ayu says
Hi, i just try your recipe. If i want to give to mu cousine tommorow, am I need to put in the freezer or just in room temperatur until tommorow??
Dana says
Once the cake cools, cover it and leave it on the counter until tomorrow. Cover the cake with foil or plastic wrap, or use a cake stand with a lid. Dust the cake with powdered sugar tomorrow, or if you already put it, add a little more if needed tomorrow. It will taste great tomorrow- enjoy!
Beth (OMG! Yummy) says
I'm not in charge of dessert this year or I would absolutely be making this!
Dana @ Foodie Goes Healthy says
Well, then it's good news that this recipe is great any time of the year.
Kathy Gallagher says
Yum! The picture makes me want to eat it!
When I make it, i place a paper doily over the top of the cake and lightly dust powdered sugar through a mesh sieve over the doily. Then I carefully lift up the doily and have a pretty pattern on top. Fancy! I also sometimes slice the cake and set it on top of a pool of raspberry sauce (from a jar) on the plate with a few fresh raspberries on top.
Dana says
Thanks for the decorating tips, so professional. And thank you for the recipe for the best chocolate dessert ever.