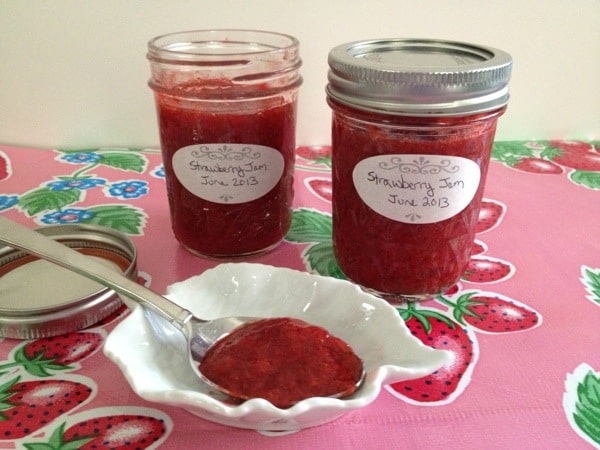
In the early days of Food Network Television, I watched a guest host make strawberry jam. She made it look so easy that I decided to give it a try. I furiously copied down the recipe on to a piece of scrap paper. At that time there was no internet recipe database, so I had to get what I could from live TV. With the Internet so ubiquitous now, it's hard to remember such a time. Luckily, the recipe is simple, so I was able to get it all down. And the recipe is as easy to make as it appeared to be on television.
Many years later, I still make the same basic recipe. However, I don't refer to my scrap piece of paper or measure any more. It's not necessary given the simplicity of recipe. Thus, I call this my "no recipe" strawberry jam.
What I like best about this jam recipe is that it doesn't use commercial pectin to thicken the jam. It uses natural pectin in the form of lemon juice and apple, which are easy to have on hand. This type of pectin doesn't firm up as densely as boxed pectin. The consistency is looser and has a very homemade quality. The jam can be used on toast and or as a topping for yogurt or cheesecake.
This summer I made my jam with strawberries from Pudwill Berry Farms. They sell at a number of farmers markets in Southern California. Their recent crop of mara de bois strawberries and yellow raspberries are the sweetest berries that I have ever tasted. In fact, I had to hide the strawberries from my family so that I could use them to make jam. With strawberries at their peak sweetness, I took this as a sign that it was time to make my jam. Here's the recipe for the small batch of jam that I made recently. With such a small batch, I didn't bother with any canning. I just put one jar in the refrigerator and the other one in the freezer. Jam making is a snap if you can skip the canning step.
Recipe

Strawberry Jam
Equipment
- 3 half pint jars with lids
- food thermometer optional
Ingredients
- 2 pints strawberries washed, green stems and hulls removed, cut in half or quarters. About 2 cups once cut.
- ½ cup granulated white sugar up to 1 cup depending on the sweetness of your berries and your preference for sweetness
- Juice from ½ of a small lemon
- ¼ small red apple with skin on finely grated
Instructions
- Sterilize 3 half pint jars and lids in the dishwasher, and set aside. Keep warm.
- Put all ingredients in a medium-sized pot and stir. Start with ½ cup of sugar. Cook over medium heat. Set a time for 30 minutes and stir periodically.
- When the liquid comes out of the berries, adjust the flame so that the liquid boils and starts to evaporate. Stir often to prevent scorching. If you get a lot of white foam on the top, spoon it out and discard.
- As the berries soften, take a potato masher (or fork) and crush the berries into tiny chunks. After about 15 minutes, taste the jam for sweetness, and add more sugar to your desired level of sweetness. I don't like to use much sugar, so I make my jam just sweet enough to not be sour.
- In another 5 minutes test the consistency of the jam, and stop cooking when the jam is just thick enough for toast and still looser than store-bought jam. If you have a candy or insta read thermometer, use it to see if the jam has reached 220ºF, which the temperature needed for the jam to gel. The jam should be ready after 20 to 30 minutes of total cooking time.
- Spoon jam into jars taking care that the jam is very hot. You should have enough for 2 jars plus a little extra. Close the lids after the jam cools some. The jam keeps in the refrigerator for 3-4 weeks and in the freezer for up to one year.
Nutrition
Nutritional Disclaimer
Nutritional information is an estimation only.


Comments
No Comments